E22 | Westford Historic Renovation | Side Hustle
Season 46 Episode 22 | 23m 42sVideo has Closed Captions
Kevin travels to Switzerland to visit one of their trade schools.
Kevin O'Connor meets Charlie Silva, who's installing maintenance-free composite siding. Inside, Kevin talks with homeowner Emily and kitchen designer Kaytlyn Constantinou about bringing her kitchen vision to life. Out back, Mark McCullough uses repurposed stone to veneer the new addition. Later, Kevin meets Tobias in Switzerland to discuss vocational carpentry training.
Problems with Closed Captions? Closed Captioning Feedback
Problems with Closed Captions? Closed Captioning Feedback
Funding for THIS OLD HOUSE is provided by The Home Depot and Renewal By Andersen.
Support provided by:

E22 | Westford Historic Renovation | Side Hustle
Season 46 Episode 22 | 23m 42sVideo has Closed Captions
Kevin O'Connor meets Charlie Silva, who's installing maintenance-free composite siding. Inside, Kevin talks with homeowner Emily and kitchen designer Kaytlyn Constantinou about bringing her kitchen vision to life. Out back, Mark McCullough uses repurposed stone to veneer the new addition. Later, Kevin meets Tobias in Switzerland to discuss vocational carpentry training.
Problems with Closed Captions? Closed Captioning Feedback
How to Watch This Old House
This Old House is available to stream on pbs.org and the free PBS App, available on iPhone, Apple TV, Android TV, Android smartphones, Amazon Fire TV, Amazon Fire Tablet, Roku, Samsung Smart TV, and Vizio.
Keep Exploring

This Old House Insider Newsletter
Get This Old House exclusive stories, tips, and behind-the-scenes information delivered right to your inbox every month.Providing Support for PBS.org
Learn Moreabout PBS online sponsorshipKevin: Today on "This Old House"... We'll reveal the final kitchen design.
Emily: I wanted to have minimal upper cabinets.
Kevin: Yeah, we heard about that.
Then I traveled to Switzerland to learn more about their vocational education program, which is one of the finest in the world, and to learn why their carpenters still wear this traditional outfit.
♪♪ ♪♪ Man: Ahh.
That's it.
♪♪ ♪♪ ♪♪ Kevin: Hey there, I'm Kevin O'Connor, and welcome back to "This Old House" and to our project here in Westford, Massachusetts, where we are helping a multi-generational family restore this beautiful 19th century home that suffered a devastating fire about eight years or so ago.
Now, on the inside of this house, the focal point has always been this center staircase, and I think you can see why.
And our homeowners knew that they did not want to rebuild it, that they wanted to restore it.
So that's what they asked us to do.
Now, on the lower stairs right here, you can see that there isn't a railing, which isn't quite up to today's code, but the building department has said that's fine.
They're gonna let us keep it as is, which is good news.
And then in terms of the restoration, well, the biggest hurdle is that most of the woodwork was covered in lead paint and that had to be properly mitigated.
So everything around here was sealed up, and then the crew came in and they started stripping everything using infrared heat, small tools, a lot of hand work.
And look at the result, this beautiful turned newel post here stripped down to bare wood.
I'm told that this is popular, as is the paneling that runs up the length of the staircase.
And in terms of the individual balusters, those were sent off site so that they could be stripped and repaired.
And pretty soon they're going to come back and they will be put between the treads and these beautiful mahogany top rails.
Now, it may not look like it on the inside, but believe it or not, we are almost halfway done with this project.
And pretty soon, when the final mechanicals are in the walls, we'll be ready for insulation and board.
But if you want to see some real progress, well, you have to go outside for that.
Our front porch here on the front of the house.
This had to be mostly rebuilt.
We were able to save some of the railing system and the newel posts, so those are coming back.
But in terms of progress, look at all of that beautiful trim work.
Isn't that awesome?
So we've got the oversized corner boards right here.
This is the same material as our side casing.
This is a composite.
We use this a couple projects ago.
It is all made out of rice hull.
Portico is being rebuilt here in place, and three quarters of this house already sided.
To prepare for that, we took off the original siding, and then we covered the house with an entire layer of insulated sheathing.
And then on top of that, we have got our rainscreen, and that starts all the way up at the soffit, comes all the way down the sidewall, goes behind this water table detail.
And then right here you can see that there's actually an outlet.
So in case there's any water that gets behind it, it's got a place to go.
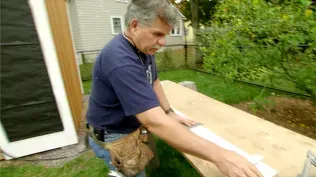
Charlie, this is starting to look terrific.
Charlie: Looks great, doesn't it?
Kevin: It really does.
And yet another type of composite siding that you're using.
Charlie: People really want maintenance free, and this product was really driven by the homeowner.
They selected it.
Kevin: So there used to be a time when maintenance free meant to me composite, no rot.
Now we're talking no paint.
You can put it up.
You don't have to paint it after installation and maybe never again.
Charlie: That's correct.
There's really nothing to be done to the siding.
Kevin: So what do we need to think about in terms of installation?
Because every manufacturer's got their own protocol.
Charlie: Well, composite materials really -- you really have to worry about expansion and contraction, right?
Kevin: Over the length versus the width, right?
Charlie: And even at butt joints, right, you have to worry about the expansion and contraction or a wood siding where we would typically caulk it, put a spline in.
In this case, we don't.
The stainless steel bar here joins the pieces together when you have a butt joint.
Let's get it lined, and the screws are only long enough to go into the siding and not into the house itself, because you still want it to be able to slide back and forth.
Kevin: Where the gasket gets compressed.
Charlie: It does.
That way you know it's set right.
You slide your other piece in to continue.
Kevin: Do you want this to be a tight seam right here?
Charlie: That's correct.
You put it right in tight.
The bar actually eliminates the two pieces being able to come apart.
Kevin: But by making it a tight joint right there, are you sort of making two pieces a monolithic single piece?
Charlie: That's right.
Kevin: So no expansion and contraction in there.
Expansion and contraction down at these ends, Opposite end.
Charlie: That's right.
So here's a piece of our trim which is that rice hull material.
We dated our own piece into it.
Kevin: So you can see that right there.
So you guys put that dated in?
Charlie: That's right.
Kevin: All right.
Charlie: So apply that to the house if this was the house.
Kevin: We can have the expansion.
We'll never see it.
Charlie: That's right.
Kevin: I'd love to sort of get a feel for how the installation goes.
I brought my belt.
Can I give you a hand?
Charlie: Great.
Well, it goes up quick, so you won't be here long.
So we have 11, four and a quarter.
Let's go right up to the window and make sure everything's the same.
Kevin: Good.
Charlie: All right.
11, four and a quarter.
All the same.
Kevin: And so comes with a starter strip.
Charlie: So the starter strip I already set earlier.
And the siding also hangs onto this little flange clip right here.
Drops right in place, which means the siding can't move.
Kevin: And then it just kicks it out right to the top of the water table.
Charlie: That's right.
Kevin: It's got a nice flex to it, so you can actually just bend it and get it behind there.
Charlie: So it's going to drop right onto that flange.
Kevin: Oh, look at that.
It clicks right in.
Charlie: All right.
Kevin: Anywhere?
just pick a slot?
Charlie: That's right.
Just keep it about a 32nd off the siding.
So I'm going to have you not even put that into that rabbit.
I'm going to put my side in.
I'm going to allow for my space.
And now I'm just going to mark these where they would go for this.
Alright, now we should have enough to go up past it.
And then it goes right there.
You can hear it going in.
Kevin: Oh, yeah.
Look at that.
Charlie: Let's nail away.
Kevin: Alright, so a little bit of fussing around the window.
But that's to be expected with any siding.
Charlie: That's right.
And we'll probably be done with this side today.
Kevin: Unfortunately not with my help because I want to go inside and do a little kitchen design, if that's alright.
Charlie: Oh, no problem.
Kevin: Alright.
Thank you, Charlie.
Charlie: Thanks for the help.
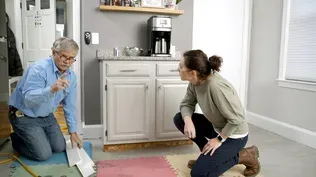
Emily, how are you?
Emily: Hey, Kevin, how are you?
Kevin: Well, nice to see you again.
Emily: Nice to see you.
Kaytlyn: Hi, Kevin.
Kaytlyn.
Kevin: Kaytlyn Nice to meet you.
Our kitchen designer?
Kaytlyn: Yes.
Kevin: We have a duo right here.
Emily: Yeah, a duo.
It's been a long process, but we're getting there.
Kevin: In that process, what was your roadmap?
What did you tell Kaytlyn you wanted?
Emily: So must haves was a green color for cabinets.
Kevin: Okay.
Emily: And I wanted to have minimal upper cabinets.
Kevin: Yeah, we heard about that.
Emily: Yeah.
Kevin: And I also heard something about table instead of island.
Emily: Yep, yep.
Just because of the space we wanted, maybe a floating table instead of a stockade island.
Kevin: Roger that.
Your house, your rules.
Kaytlyn, how did you navigate that list of wants?
Kaytlyn: I mean, it's pretty easy.
I do actually do a lot of cabinets.
I mean, kitchens without wall cabinets these days.
A lot of people want to minimalize that.
Bigger windows, just light, airy feeling.
But we're getting more creative with storage inside drawers, putting plates and bowls down below the counter.
Kevin: So you have plans?
Oh, you even have a computer running, may I?
Kaytlyn: Yeah, of course.
Kevin: Why don't you walk us through sort of a beautiful pictures here.
Let's see.
This is this wall here?
Kaytlyn: Yeah, yeah.
So we've got the refrigerator here on the end.
Kevin: We can see that, yeah.
Kaytlyn: Yeah.
And then carrying across the wall.
We do have some wall cabinets.
Kevin: So those are upper cabinets.
Kaytlyn: They are.
Kevin: That was allowed?
Emily: Yep, those were allowed in the corner.
Kaytlyn: Yes, yeah.
So we're going to put lots of food storage in there for cooking.
We're going to come over here to the induction, doing a beautiful wood curved hood.
Kevin: So that's going to match the cabinet style.
Is that 30 inches that I'm looking at?
Kaytlyn: Yes.
Kevin: Modest size, that's nice.
Emily: Modest size, yep.
Kevin: And all we had space for.
Yeah, between our windows.
Kevin: Yeah.
Kaytlyn: Yep.
Then we carry down.
We have a nice long countertop for prep.
We do have a microwave there, so it's a little other task area there for the microwave.
Kevin: So I see the notification for microwave as I look at the rendering.
Is that one of those drawer slide out units or is that just tucked into a cubby?
Kaytlyn: Just tucked into a finished opening so they have the ability to swap that out.
Kevin: Also modest.
I'm also looking at, I think, a corner cabinet.
Is that also an upper?
Emily: Yep.
Kaytlyn: So and there's a pair on the other side.
Kevin: Oh, there it is.
Kaytlyn: So we've got two towers there.
The one thing that doesn't work in the draw is going to be your glassware with the soft close.
And it just -- it's not a good recipe.
Kevin: Farmers sink with the exposed front, dishwasher to the right and obviously the door behind you right there.
Kaytlyn: Yep.
Kevin: That's pretty nice.
So I guess the big question is, without the upper cabinets, I mean, it is a big space.
It's not like you're struggling for space.
Emily: Yep.
Kevin: But that's okay.
Emily: That's okay.
Kevin: Because there's still a lot of storage you're going to get.
Emily: Exactly.
Kevin: And why not the island?
I mean, that's probably one of the most popular pieces of, I guess, furniture in a house.
Everyone saddles up next to it.
Emily: Yeah, yeah.
Well, because of the open space in the dining room, we're going to have our dining room table there, and I just figured we wanted something a little bit more modest, maybe just a prep area.
And if we want to switch it out later, we can do that.
Kevin: Fair.
Emily: A little flexibility.
Kaytlyn: Yeah, and when you're having a big party, you can actually remove it out of the location so that it doesn't hinder the walk space.
Kevin: Have you been in that situation where a homeowner has changed their mind and said, "You know what?
The floating table worked for, but now we'd like to put in cabinets or lower cabinets and a counter?"
Kaytlyn: Yep, yep.
No, I've definitely come in and added islands to existing kitchens.
Definitely.
Kevin: Alright.
Well, it sounds like if you change your mind, there's hope.
Emily: Yeah, exactly.
So let's talk about some of the stuff that you pick.
You said you wanted green.
Emily: Yep.
Kevin: Is this the final green?
Emily: This is the final green.
Kevin: And is this the final style of cabinets?
Kaytlyn: It is, yeah.
We're going with a beaded inset, flat center panel.
Nice little profile in there.
Kevin: That's terrific, right.
So a very classic look.
My favorite kind of cabinet right there, so that's a great choice.
And are these attached?
They are not.
So bronze, brass.
Which are we looking at?
Emily: Okay, warm brass.
Kevin: Warm brass.
Classic is very popular right now.
Emily: Definitely very popular.
Kevin: So we have pulls for the drawers.
Knobs for the doors right there, okay.
Kaytlyn: Yeah, and then we have this satin brass that we're going to add to the hood.
Kevin: That's going to be a little bit of an accent over that right there.
Kaytlyn: Yes.
Kevin: It's going to really tie it together.
Emily: Yeah.
Kaytlyn: Exactly.
Kevin: And it looks like maybe you are in the decision-making mode for countertops.
Emily: Yes.
Kevin: These are all the same material.
Quartz right?
Kaytlyn: They are.
Easy maintenance for sure.
You get those nice, light countertops without having to worry about staining.
Kevin: And have you decided?
Emily: I think we are going to go with the more taupe option.
Kaytlyn: Awesome.
Emily: I really like that.
Kevin: So no offense, but is mom on board?
Emily: She is on board.
Kevin: Okay.
Emily: She's very much on board.
Kevin: I don't know who's got the final vote.
I know it's been collaborative up until now.
Emily: Yes, yes, Kevin: I know she's not here.
So, alright, that's good.
Aright.
Kaytlyn: I'm excited.
Emily: Me too.
Kevin: So if this is all decided, that's all decided, is this floor plan locked down?
Does Charlie get what he wants?
Emily: I think it is.
Kaytlyn: Locked down.
Kevin: Finished plans and he can start building off.
Kaytlyn: Finished plans.
Emily: Yep.
Kevin: Very nice.
Well, that's good.
It's going to be a handsome looking kitchen.
Emily: Yep.
We are very excited to see it to come to life.
Kevin: Good.
Thank you, Kaytlyn.
Appreciate it.
Kaytlyn: Thank you.
Kevin: Backyard is still very much a work site, but some progress with the backfill that we have here.
You may recall that we had a commercial-sized septic system put in.
So two tanks, 2,500 gallons and a 1,000 gallon tank.
Tarp up right here because we got some rain coming, and this is what the homeowners are calling the greenhouse.
A lot of windows, probably have some plantings in there, deck up top and a mason down below.
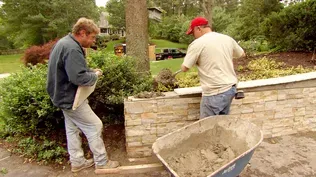
Mark, how are you?
Mark: Hey, Kevin.
Kevin: I bet you are excited about this stone, huh?
Mark: Oh, this is a dream come true.
Kevin: So, you know, I remember helping you cut this opening for what's going to be the new garage.
A lot of heavy lifting, but you were able to repurpose it.
Mark: So one of the biggest problems on this type of job is mimicking the stone.
So anytime we have the opportunity to repurpose, we take advantage of it.
This was a perfect scenario.
When we did the demo, we put it on a pallet after you and I knocked it down, we went right to the shop with it.
We sliced it.
It's the Chelmsford Westford granite that you see predominantly in this neighborhood.
Kevin: Which people love and try to get their hands on it.
The fact that you've got as much as you need is awesome.
Mark: Right.
Kevin: So who's happier?
You, that you get a perfect match or the historic commission that we can reuse it?
Mark: I got to say, tie score.
Kevin: Excellent.
Alright.
We've got finished space in there, which is going to be heated.
So we've got a foundation that's been insulated and waterproofed.
And now it's your job to give us a veneer on the bit of concrete sticking up.
Mark: Right.
So we did this yesterday.
We always start with the corner piece, and we're going to work our way back into that wall.
Kevin: So you actually cut these corners as well?
Mark: Yep.
And when you come around the corner you're going to get a visual like it's a full stone.
Kevin: Okay.
So your process for getting it up there is what?
Mark: So I have a mortar.
It's a modified mortar.
It has, for intent and purpose, what we'll call glue in it.
Kevin: So you've got an additive in there for adhesion.
Mark: That's right.
So all I'm going to do slap it onto the back of the stone.
We call this battering the back.
Kevin: And loading it up like that takes out some of the imperfections on the back.
I mean, I know it's cuts, you know, it's sliced smooth, but there are still saw marks.
Mark: That's right.
And that you're exactly right.
That'll take these sins away.
But you can see how this mortar wants to just grab that stone.
Kevin: Yeah, not slumping off at all.
Mark: Right.
I always like to give a little furrow.
And that way when I go in, I can wiggle it.
Kevin: Now, are you hoping that this is going to hit this little ledge here or not?
Mark: So I'm going to grab my two foot.
I'm looking good there.
Kevin: Oh.
Mark: And that end, so that's just got to come up and we'll just shim it.
Kevin: Yep.
Mark: So let's see how we did.
Kevin: Oh, look at that.
Mark: Look at that.
Kevin: In this case, mortar behind your corner piece, not underneath?
Mark: Right.
So once we get all the stone up, we're going to come back and repoint.
And that's when I'll hit that.
But don't forget, the grade is also going to come up and cover that.
Kevin: Okay.
♪♪ And that's it.
How long do you have to work with that mortar mark once you mix.
Mark: It usually sets up in about an hour.
It's really pretty pliable up until then.
Kevin: Yeah.
♪♪ Mark: So you can see I'm going to stagger these corners.
Kevin: Yeah.
It's like the most satisfying jigsaw puzzle.
It's so good.
♪♪ Yeah.
♪♪ Mark: So we can -- I want get that in there?
Yeah, I can feel it.
Oh, yeah.
Kevin: Mark, that is awesome.
Mark: So we'll let it set up overnight.
We'll come back.
We'll pull all these shims out.
We'll get our type-S mortar.
We'll hit the head joints.
We'll hit the bed joints, sponge her down.
We should be good.
Kevin: Nice job, man.
Very nice job.
Mark: Thanks for your help, Kevin.
Kevin: As you know, we have been following the problem with the skilled trades for some time now.
Too many people retiring, too few people joining to fill the ranks.
And quite honestly, we have not found a solution yet here in the United States.
But there are some places that have solved it, and one of those places is here in Switzerland.
Now, when you hear Switzerland, you may be thinking of chalets or the mountains, but here they are very much thinking of vocational training.
Switzerland has a national program that takes students as young as 15 years old and gives them a paid apprenticeship, skills and a full blown career.
Recently, I had the opportunity to visit this trade school in Bern, Switzerland to see the program in action.
This whole system of vocational technical training is basically a joint venture between the government of Switzerland and private companies, who benefit from getting all of these trained employees.
Toby, you are one of those company reps. Nice to meet you.
Tobias: Nice to meet you.
Kevin: So, carpentry is the purpose here.
Specifically timber framing.
Tobias: Specifically timber framing.
So what you have in here is, like, 150 students a year who get taught how to do their job.
So that means they start a four-year educational program, which is a dual system we call that in Switzerland.
So they have a certain part within the company they're hired from.
Kevin: Right.
Tobias: And they have educational programs which are in mixed group and as well focusing on carpentry as we see here.
So after four years they have to pass the test to get the official certificate, and then they are officially carpenter, and most of the time, can stay within the company they started with.
Every official job in Switzerland starts with an apprenticeship or a vocal training like that.
Kevin: All of them?
Tobias: You start as a barber, you do the same thing.
It might be three years, it might be four years, but you do exactly the same thing.
Work at a company, get your school as well at the same time, and at the end you get a certificate when you pass the test.
Kevin: So that is a very intensive focus on vocational training.
Tobias: Yes.
Kevin: Where does that cultural sensibility come from?
Tobias: Um, well, I think the overall goal is not to have just people who are good at their job, but they're also capable of, you know, living a good life.
And it's an overall perspective on getting young people to be grown ups at the end of a vocational training.
Kevin: Well, that's impressive.
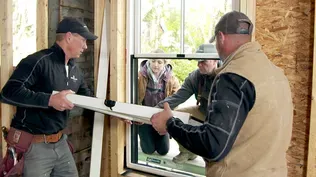
Tobias: Yes, that's an entire house for educational purposes.
So you have tons of details in there.
Details for renovation for newly built homes, and they can test certain techniques to get their job done, and they will see that also on the construction site.
Important is at the end of the day they have to rebuild it so the next day a new student can work on the detail again.
Kevin: So build it and take it apart until they get it right?
Tobias: Exactly.
And there's an instructor walking around and helping them out, getting the details done properly.
So what we're looking at here is third year students in drafting their drawing this module.
And at the end of the day, it's their job to finish it exactly the way it is right now.
And it's very intense and very focusing on details.
Kevin: In terms of all the things that they're going to do, where does this rank sort of in terms of difficulty or intensity.
Tobias: On a scale from 1 to 10, probably an 8 or a 9, because it really comes down to the details.
Kevin: Right.
So hence the third year in the process.
Tobias: Everything they do in this training will happen at some point in their career.
So they're using details they will see or have already seen in construction sites.
Kevin: This is fairly complex.
Are they going to pull this off or...?
Tobias: Well, they're going to make mistakes and they let them do mistakes as well.
So if you make a mistake in your draft, you're going to end up having problems doing the module at the end.
And that's how they learn, to be precise.
After four years of training, they have to pass a test to become a carpenter, and 50% of the test is theoretical and 50% is practical.
And what you see here is the carpentry work of a student who passed this summer.
Kevin: This is the test?
Tobias: This is the test, and he did that from scratch.
So he made the plan, he cut the wood and he put it together.
And this work was so good that he even won a prize.
Kevin: Very nice, yeah.
That is good work to my eye.
So upon graduation out into the field with a company fully employed.
Tobias: Exactly.
That's how you start your career as a carpenter.
And as you saw today, there are many ways to move forward.
Kevin: And companies like yours has got a continuous pipeline of new and very skilled talent.
Tobias: That's exactly what it is, yes.
Kevin: Skilled trades are in good hands here.
Alright.
Toby, thank you.
Tobias: Thank you.
Kevin: Appreciate it.
♪♪ Charlie: This is coming up.
Kevin: Hey, fellas.
Charlie: What the?
Mark: Whoa!
Kevin: Huh?
Mark: Whoa!
Charlie: What?
What's this?
Kevin: What do you mean what's this?
Mark: Is there a St. Bernard that's gonna follow?
Kevin: So I just got back from Switzerland, and while I was there, I picked up this little gem.
It's got a story.
It is a traditional carpenters outfit.
All the trades in Switzerland have one.
The black signifies carpentry.
It's been around and worn for hundreds of years.
Mark: Nice.
Kevin: And as a young apprentice, when you graduate to journeymen, you graduate with this and you literally will travel around looking for work.
And this is -- this is sort of your calling card.
If you're wearing this, you are skilled, you are able to do the work and you're going to get yourself hired.
Charlie: I like it.
Kevin: And you look good.
Mark: Yeah.
Charlie: You do, wow.
While you were in the Alps running around... Kevin: Running around?
Charlie: We were here working in the basement.
As you can see, we have the closed cell foam down.
It actually runs from one end to the other under the slab you see.
Kevin: Yeah.
Charlie: And we're doing two pours because that's condition space but level.
Kevin: Yes.
Charlie: This is the garage side.
It's going to be poured tomorrow actually.
And it has a positive pitch right to the outside.
Kevin: Very nice I like it.
Okay.
Well, looks like you guys have a plan.
Mark: We do.
Charlie: We do.
Kevin: Alright, until next time.
I'm Kevin O'Connor.
Mark: I'm Mark McCullough.
Charlie: And I'm Charlie Silva.
Kevin: Signing off for "This Old House" here in Westford, mass.
Nice, right?
Charlie: I do like it.
Kevin: Go ahead.
Give it a little, it's cord.
Charlie: Just so you know, size large, okay?
Kevin: Next time on "This Old House"... Tom: Today we're going to hang some new gutters.
Give you the look of wood, but maintenance free.
Heath: Nice job.
Kevin: Our homeowners want to add solar power to their 1890s colonial, but roof panels are not an option.
So start the drilling.
Heath: And we'll bring this century-old chandelier back to life.
Am I seeing that right?
Is that just bare wires covered in tape?
Man: That's what it was.
Heath: Wow.


Support for PBS provided by:
Funding for THIS OLD HOUSE is provided by The Home Depot and Renewal By Andersen.